Amazon IGV backend setup
Context and state of the art
This is our first guest blogpost graciously contributed by Andrew Patterson from Melbourne Genomics who is deploying this IGV solution in Melbourne to medical scientists.
Before we dive in, it is important to note that until @igvteam merges in pullrequest #620, the functionality we describe here works only with AWS UMCCR IGV temporary fork, freely available here.
Your regular IGV installation does not have this functionality included, yet. We are actively working with Jim Robinson and his team at the Broad Institute to get it merged into IGV proper.
AMAZON CHANGES MERGED UPSTREAM on 2019-09-11 !!!
IGV versions >= 2.8.12 incorporate the AWS functionality outlined below.
Note authenticated access is currently restricted to the following file formats:
- BAM
- CRAM
- tabix indexed VCF (vcf.gz / vcf.gz.tbi)
- non-indexed feature file formats
There is work in progress to support other formats such as BigWig in the near future.
AWS backend deployment step by step
IGV desktop has had a feature added as described on an earlier UMCCR’s blogpost about IGV to support to use of BAMs in S3 storage by using native AWS authorization and authentication to access the bioinformatics data.
This means that S3 URIs such as:
s3://my-bucket/NA12878.bam
can be opened directly by using an OAuth user AuthN/AuthZ to establish permissions to access files.
In this short document we will go through all the steps to setup an AWS account allowing this login - and the corresponding configuration settings needed for IGV.
Don’t worry about the fact the screenshot details are exposed in this guide - after the demo was made these settings have all been deleted! You will see red text throughout the screenshots to indicate pertinent settings. These will all be explained at the end of these instructions - they will be a handy reference for where these settings are needed when constructing the IGV configuration file.
User Pool
OAuth
Building on techniques already in use in IGV for accessing Google resources - the IGV S3 feature uses OAuth to obtain credentials that can be used for loading and browsing S3 buckets. Specifically in this example we will use AWS Cognito to be both the OAuth endpoint and the database of registered users.
Cognito (and OAuth) allows many other combinations - including enabling social logins (Google, Facebook), or 3rd party OAuth aggregators (Auth0 etc). We will not deal with these configuration in this guide however, although UMCCR does use user federation and it is a recommended best practice to manage user credentials and access.
A source of users
An authenticated login obviously needs some concept of a ‘user’ (with associated details such as email, name and password). Within AWS Cognito - this user source is called a User Pool.
We go to our AWS Console / Cognito and ‘Create a User Pool’. In our demonstration we call this pool ‘IGV User Pool’ and we accept all the default configuration settings - as we will be stepping through changing them after creation.
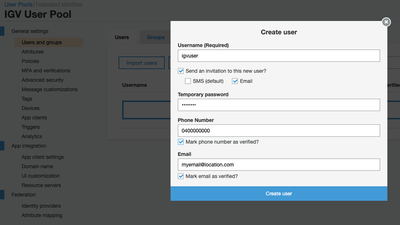
We then go to ‘Users and groups’ and create our demonstration user ‘igvuser’ (with whatever details are appropriate - AWS is a bit finnicky about the format of the phone number and has a reasonably strict default password policy).
General settings / App clients
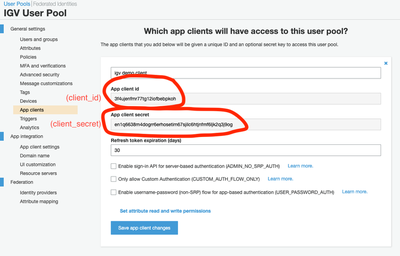
OAuth clients (which is what IGV will be behaving as) must be explicitly added into a user pool in order to enable logins by users in the pool. Here we go to ‘App clients’ and create a new client - accepting the default settings and giving it a unique app client name of ‘igv demo client’.
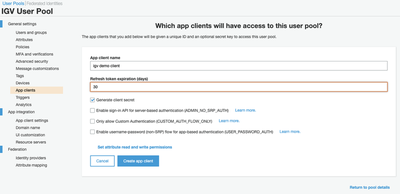
Immediately after creation, an ‘App client secret’ has been made for us. These settings are needed for the IGV configuration so we show this screenshot purely for those purposes. No actual changes need to be made to the app client here.
App integration / App client settings
Once the app client is created - we need to complete the User Pool by putting some custom settings into the app client related to how IGV is going to call it. We also need to create a domain that IGV will use for finding the OAuth endpoints.
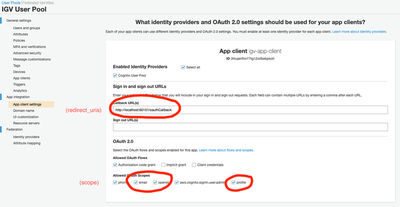
When we first come into the app client settings - the app client we have just created is effectively disabled. We need to enable the
client (‘Select all’), specify the callback URL that is going to be used by IGV (this is a localhost URL that defines
where IGV on your desktop listens for information coming back to it - and must be http://localhost:60151/oauthCallback for
a standard IGV desktop setup), and switch on OAuth 2.0.
The final settings for our client are shown below.
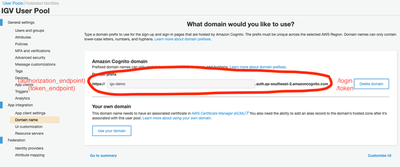
App integration and Cognito domain name
We need to create a domain to define the URLs that IGV will visit to initiate actions. The domain must be globally unique, so come up with a relevant name for your purposes. Note that unlike most settings we are hilighting in these screenshots - these go into our config files with some suffixes (i.e they do not copy directly).
Other
There are many other settings for Cognito user pools - dealing with how logins look and feels, password complexity rules, MFA etc. We will not go into them in these instructions - but these should all be evaluated in any production scenario.
Identity Pool
We have now set up a user pool - a source of users - but there is no mapping yet between these users and a set of AWS credentials that will be needed to access the AWS S3 files. To establish this mapping - we need to set up a AWS Cognito Identity Pool.
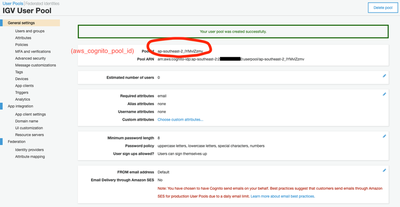
Before starting - we need two settings from our User Pool - so go to the settings of our previously created User Pool and write down the following values.
The app client id is a random string created during our User Pool setup. It will look something
like 3f4ujenfmr77tg12iofbebpkoh and will be labelled ‘App client id’.
The pool id is a shorter random string created when we first made the User Pool. It will look something
like ap-southeast-2_IYMvlZzmv and will be labelled ‘Pool Id’.
We then create an identity pool, entering in the settings from above and a unique identity pool name.
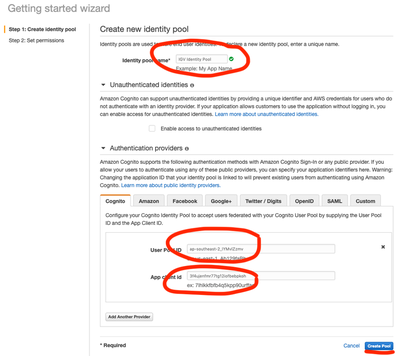
The next page will then allow use to create AWS user roles associated with the Identity Pool. The ‘authenticated’ identity role is the only one of interest to us - and it is fine to accept the defaults. We will add to these defaults later to give the role the ability to access S3.
Finally for the Identity Pool - we need to find the newly created Identity Pool ID. This is shown in multiple spots in the AWS Console UI - but can be seen easily when we go to ‘Edit Identity Pool’.
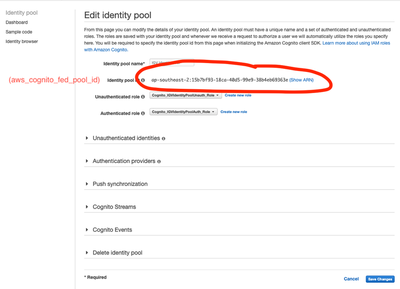
Last but not least, AWS Cognito has an issue with user tracking that can only be circumvented by activating the “Basic (Classic) Auth Flow”. Do not worry, this technical detail only means that, as an administrator you will be able to track your user’s actions on CloudTrail. With the Enhanced Auth Flow, properly auditing users is currently not possible at the time of writing this (March 2020). In practice this means that you should enable the following on your Identity Pools:

Otherwise, the following error message will show up on your IGV desktop console log:
ERROR [2020-03-13T11:12:48,706] [OAuthProvider.java:240] software.amazon.awssdk.services.cognitoidentity.model.InvalidParameterException: Basic (classic) flow is not enabled, please use enhanced flow. (Service: CognitoIdentity, Status Code: 400, Request ID: 119beb3a-d75e-442d-b72d-1ed320fb7df8)
Roles and policies
The whole point of this exercise is to load a BAM from S3 - so let’s make a bucket with a BAM and create the permissions necessary for us to access it.
The first step we will need to do is to give the IAM role in our account enough permissions to access S3. The default IAM role as created automatically by Cognito has a very restricted set of rights. Here we have gone to the role (look for the one called *Auth_Role) and added a *read only* custom policy that fits our needs:
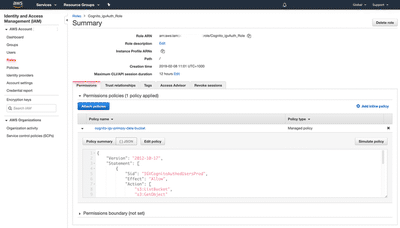
For instance, one could use the following custom policy attached to the authenticated role:
{
    "Version": "2012-10-17",
    "Statement": [
        {
            "Sid": "IGVCognitoAuthedUsersProd",
            "Effect": "Allow",
            "Action": [
                "s3:ListBucket",
                "s3:GetObject"
            ],
            "Resource": [
                "arn:aws:s3:::igv-demo-bucket",
                "arn:aws:s3:::igv-demo-bucket/*",
            ]
        },
        {
            "Sid": "IGVListBuckets",
            "Effect": "Allow",
            "Action": [
                "s3:ListAllMyBuckets"
            ],
            "Resource": [
                "arn:aws:s3:::*"
            ]
        },
        {
            "Effect": "Allow",
            "Action": [
                "mobileanalytics:PutEvents",
                "cognito-sync:*",
                "cognito-identity:*"
            ],
            "Resource": [
                "*"
            ]
        }
    ]
}
*Please make sure that the Unauth_Role has no policies attached (implicitly denying all actions by unauthenticated users), otherwise those users may access some of your resources on AWS. The following screenshot shows the expected result:

The reason for this emphasis is that there have been security incidents with misconfigured Cognito installations:
Research on common AWS Cognito misconfigurations to be presented at Black Hat by @AndresRiancho. https://t.co/hMYRk74eNY
— Scott Piper (@0xdabbad00) May 2, 2019
So it’s worth to pay attention to it and be safer than sorry.
S3
Now all we need is a bucket with a BAM - so find a BAM (and index file) from somewhere and upload them into a bucket.
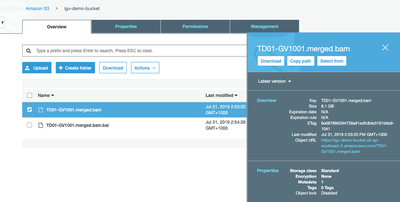
Note: there are no special permissions on this bucket - it is a private bucket just in the same account as our Cognito - thereby showing that private BAM files can be accessed. Obviously the S3 permissions model allows use much more flexible scenarios, including cross account bucket sharing.
[OAuth provisioning URL][#igv-url-provisioning]
Finally we need to bring all these settings together in IGV to allow
it to trigger the authentication process. For this, you should host a file
called oauth-config.json.gz on a public http server. For convenience, one could just
create a S3 bucket with CloudFront hosting
the json file contents below, compressed with gzip. Once the file can be accessed publicly, respecting AWS guidelines for safe public S3 buckets, please paste that public URL on IGV’s View->Preferences->Advanced->OAuth provisioning URL, as shown in this screenshot:

The config file you are editing contains all the instructions to allow it to connect to Cognito:
{
   "apiKey": "",
   "project_id": "igv",

   "auth_provider": "Amazon",
   "auth_provider_x509_cert_url": "https://www.googleapis.com/oauth2/v1/certs",
   "aws_region": "ap-southeast-2",
   "scope": "email%20openid%20profile",
   "redirect_uris": [
     "http://localhost:60151/oauthCallback"
   ],

   "client_id": "3f4ujenfmr77tg12iofbebpkoh",
   "client_secret": "en1q6638m4dogrr6erhosetim67sjilc6htjnfmf6ljk2q3j9og",
   "authorization_endpoint": "https://igv-demo.auth.ap-southeast-2.amazoncognito.com/login",
   "token_endpoint": "https://igv-demo.auth.ap-southeast-2.amazoncognito.com/token",
   "aws_cognito_fed_pool_id": "ap-southeast-2:15b7bf93-18ca-40d5-99e9-38b4eb69363e",
   "aws_cognito_pool_id": "ap-southeast-2_IYMvlZzmv",
   "aws_cognito_role_arn": "arn:aws:iam::YOUR_AWS_ACCOUNT:role/YOUR_Cognito_igvAuth_Role"
}
Settings in the config must be set to values that are unique to your particular installation (there is no point copying the values directly from the example JSON!). These values come directly from various stages in our User Pool and Identity Pool creation. To help match where the values come from - you can go back through the above screen shots - and look for red text
(key) to show where directly in the AWS Console the values have come from.
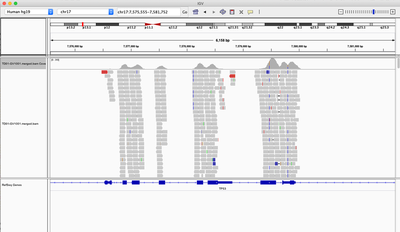
IGV is ready to see data from AWS S3
Once these settings are made - run IGV on your desktop and go to the menus Amazon / Login.
A browser page should open up asking you for the username and password you created earlier. On the first login - it may also prompt you to change your password.
The menu Amazon->Load From S3 will present a listing of objects that you can load, in case you want to load more than one track at once.
Furthermore, File->Session Save and sharing the resulting .xml session file, allows to securely share the context of tracks loaded, including zoom levels and regions of interest to collaborators.
Alternatively, if you know the path of the file on S3, once logged in, go to File / Load from URL. Enter the S3 path to the BAM you have uploaded as shown below.
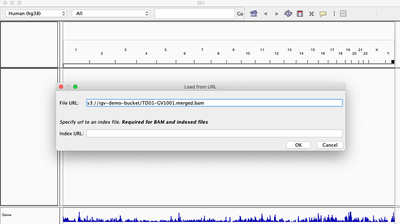
If all has gone well you should be able to see the BAM content as if the file was sitting locally on your computer.